This chapter contains the following topics:
Special Forms and Laser Printers
Windows Printer and PDF Forms Table
Form Image File Use and Design
Printing in a Linux Environment
Device name Field Windows Printing Controls
Multiple Printer Setups Using Configuration Files
Special Forms is the common means of providing data and the exchange of monies to customers, vendors and employees. Forms are usually printed and PBS Special Forms can be printed through the Company information printers in Linux or also through the Windows printer in Windows and thin client.
Laser printers is the most common means of printing. What makes laser printers different from other printers, for the purposes of the PBS reports, is not the technology they use for printing, but that they use individual paper sheets instead of continuous forms. Any adjustment that a dot matrix (pin-feed) printer may need, the operator supplies by twisting knobs on the printer itself. For laser printers, the PBS software provides the adjustment. Even so, it is mostly when printing on pre-printed forms that this makes a significant difference. When a laser printer is being used for printing on blank stock, it looks to PBS like any other printer.
The adjustment options are different on Company information laser printing vs. Windows printer. To make the alignment adjustments the Company information sends PCL command codes to the printer while the Windows printer sends control properties to the printer driver.
If you are using a Company information setup for printing and you need to do an alignment, it is best to not use a Desk jet or multi-function type printers. These types of printers either do not accept PCL codes or they accept limited adjustments. We often refer to these printers as "Windows only" meaning they only print what the windows driver tells them to print. Most Laser printers allow a full PCL code alignment. The available adjustments using a Windows Printer will depend on what is programmed into the driver that is installed on the workstation.
In general printing through Company information printers takes less time than printing through Windows printer. This is especially true if you merge a form file with Windows printer. The benefits of using Windows printer is the following.
| • | You can merge data with a form file. |
| • | You can select any printer on the workstation. Windows only printers do not work well for printing forms through a Company information printer setup. |
|
Note |
It Is recommended that you do not select a dot matrix type printer when printing to Windows printer. The performance may be slow and the font size may not line up properly on the form. |
The printable area on a page will differ when using a Company information printer vs. a Windows printer; even if it is the same printer. Generally, Windows printer drivers allow less printable area on a page than PCL code printing. Therefore, if you are using a designed format that prints fine using Company information, you may have to reduce the format lines and columns so that it prints properly using Windows printer. When you do this, it may no longer match your form. Therefore you may have to purchase newly designed forms in order to use Windows printer. It is recommended that you do not use Windows printer when printing checks.
Many forms are user definable. This allows you to define the number of lines that print on a page. With the printers we have used, 63 is the maximum amount of lines per page that will print using Windows printer. Most ‘Classic’ forms are designed to allow 66 lines per page through a Company information printer so if you want to use one of them, you must modify the form length and possibly the header, lines and totals sections. When printing Point of Sale invoices to Windows printer, the program automatically reduces the number of printed lines.
Using PBS, in addition to reports, lists, financial statements, and labels, special forms may also be printed.
Some types require pre-printed forms. Examples of these include:
| • | A/P checks |
| • | A/P 1099s |
| • | Payroll checks |
| • | Payroll W-2s |
| • | Payroll 1099s |
Refer to information from your forms suppliers regarding purchasing pre-printed laser forms.
The following special forms can print with a merged graphical file that represents the form layout or on pre-printed laser forms from your forms supplier.
| • | A/P checks - It is required to have pre-printed check forms but you may print your logo on the check. Stubs are user definable. |
| • | A/R statements |
| • | A/R invoices |
| • | O/E invoices and other forms |
| • | P/O purchase order forms, both fixed formats and user defined formats |
For information on designing your form, read the Form Design section below.
The following forms in PBS software are printed on blank paper:
| • | Labels in A/R, A/P, Payroll, I/C, P/S and O/E |
| • | Picking Tickets in O/E. They may also be printed to a form |
| • | Picking Tickets and Receipts in P/S |
| • | One P/S invoice type can be printed on blank (plain) paper |
| • | Work Orders in I/C |
The following forms may be optionally printed on blank paper:
| • | Purchase orders in P/O |
| • | Invoices and statements in A/R. Refer to the Format Design Kit appendix in the A/R User Manual for information on user designed invoices. |
| • | Invoices in O/E |
| • | Customized Quarterly Reports in Payroll |
| • | The 941 report is printed to a special PDF format. See the payroll user documentation for details |
| • | Customer order invoices |
To print to a specific tray, set up the printer on the workstation to default to the specific tray in Start > Settings > Printers. Then in PBS, use the Company information <F7> setup to select that printer. Use a device name like HP Lower Tray or something the user can identify.
General printing information is available in the PBS System documentation. If you need a general understanding of the printing features you should read this first.
If you need to setup a company information printer, the setup instructions are found in the Fourth Tab - Printers section of the Company information chapter.
The printing types have some differences between character mode and graphical mode. Here is an explanation of the printing types:
|
Printing Type |
Description |
|
Company information printer |
This is similar to the classic legacy printer setup but has been expanded to allow an easier workstation and network printer configuration and to make the printer setup process easier. You may set up as many as 12 printers per company. To set up a printer see the Fourth Tab - Printers section in the Company information chapter for more details. |
|
-PDF and -PDFP- Company information printer |
A (-PDF-) printer name in Company information sends the print job for forms, like invoices, to a PDF file. The (-PDFP-) designation also creates a PDF file and it immediately prints the file. The PDF files can be emailed to customers and vendors. For the setup of PBS emailing, see the Email Configuration appendix.
In the case of a report, the PDF file is displayed when selecting -PDF- and -PDFP-. For reports you may prefer to use View as PDF as explained below.
A PDF file should be viewed in Adobe Acrobat Pro or Acrobat Reader. |
|
Windows printer |
This is a standard Windows printer spooler. It is not available in Linux unless you have Thin client. |
|
The graphical mode options are: View as html View as PDF |
HTML files are displayed with the help of your local browser. Some browser versions have limitations as to the file sizes. If it is a very long report it may be better to use PDF which does not have this limitation. |
|
The character mode option is: Display on screen
|
After selecting Display on screen the options are P = PDF, H=HTML, C=Character and N=Choose another printer.
Selecting either the P, H or C option allows you to view data on the screen. The C=Character option is more like the version 10 and earlier, classic Display on screen. |
|
Create HTML |
This creates an HTML document and displays the data in the PBS browser. The Create HTML option is only available when running in character mode. It works in the same manner as selecting Display on screen -> H=HTML. |
There are different options for printing depending on the operating system as seen in the two following tables.
Windows and Thin Client Printers
This table represents the printer types that are available in Windows and Thin client:
|
|
Company information printer |
-PDF- & -PDFP-Company information |
Windows printer |
Display on screen |
View as HTML |
|
General Reports |
Yes |
Reports are displayed when selecting -PDF-.
-PDFP- should not be used for reports |
Yes |
Running in character mode there is the Classic display, PDF printer and HTML
Using graphical mode you have View as HTML or View as PDF ** |
This is a graphical mode option.
Using character mode the option is Create HTML. |
|
Forms |
Yes |
Yes, but with only A/R Invoices, Statements, O/E forms, Purchase Orders, Point of Sale and Manufacturing forms individual files are created for each transaction.* Only immediate invoices display as a PDF. |
Yes, this is available for most forms except for Time and Billing. It is not recommended for Payroll checks. |
N/A |
N/A |
|
Posting (Audit trail) reports |
Yes |
You cannot use a PDF printer for Audit trail reports. *** |
Yes |
N/A |
N/A |
|
Print reports from disk |
Yes |
Yes, the report is displayed. ** |
Yes |
N/A |
Yes |
* All other forms will print via a standard Company information printer when using a -PDF- and -PDFP- printer selection. You may merge a graphical file that contains the logo, lines and general form graphical image with the variable form text using this feature.
** Viewed (Display on screen) reports are created in the RWRK temporary directory. Much of what gets created there is deleted immediately after use. The remainder of the contents is deleted the next business day when PBS is first started. In order to retain a report, you must save the report to another location or print it before closing the PDF or html document.
*** When posting audit trail reports, you may select Windows printer, a Company information printer (one that prints to paper) or print to disk. From Reports print to disk, under CTL, you may select to view the report as a PDF file or print it.
Linux
This table represents the printer types for Linux when NOT using Thin client:
|
|
Company information printer |
-PDF- Company information |
Windows printer |
Display on screen |
Create HTML |
|
Reports |
Yes |
N/A |
N/A |
Yes with Classic display only |
N/A |
|
Forms |
Yes |
Yes, but with only A/R Invoices, Statements, O/E forms, Purchase Orders, and Customer orders invoices. Individual files are created for each transaction* |
N/A |
N/A |
No |
|
Posting reports |
Yes |
N/A |
N/A |
N/A |
N/A |
|
Print reports from disk |
Yes |
N/A |
N/A |
Classic display |
N/A |
* All other forms will print via a standard Company information printer if you select a -PDF- and -PDFP- printer. You may merge a graphical file that contains the logo, lines and general form data with the variable form text using this feature.
The -PDFP- printer should NOT be used in a Linux environment without Thin client.
A graphical image form may be combined with PBS data using Windows printer to produce a printed form or a Company information -PDF- and -PDFP- printer to produce a PDF file.
A Windows printer option is available on every Windows system and any Windows or Linux system using Thin client. To set up a PDF printer see The Printer-name field and PDF Printing in the Company Information chapter.
Graphical image examples for invoices, purchase orders and statements are located in the Images folder under the top-level PBS. You may modify these as needed for your system. See the Form Image File Use and Design section.
The following is a table that lists the forms that may be printed utilizing Windows printer, or a Company information -PDF- or -PDFP- printer.
The first column is the type of form. The second column indicates the form that may be printed using Windows printer. The third column indicates the forms where you can merge PBS data with a Jpeg or Bitmap designed graphical image form. The fourth column indicates the forms that may be sent to a -PDF- or -PDFP- printer. The fourth column indicates the user documentation name and chapter where you will find additional setup information.
|
Module - Form Type |
Window Printer Data and Image File Merge |
PDF Printing Image File Merge |
User Manual Setup Reference |
|
Accounts Payable |
|
|
|
|
AP Checks - Batch alignment and print |
Yes * |
N/A |
N/A |
|
AP Checks - Immediate alignment and print |
Yes * |
N/A |
N/A |
|
Checks - Forms design print |
Yes * |
N/A |
A/P, Chapter 25 Check forms |
|
Vendor labels alignment and print |
No |
N/A |
A/P, Chapter 4 Control information, Default immediate printer field |
|
Year-end Print 1099 forms |
N/A |
N/A |
N/A |
|
|
* Merging with a check form file is only available when using a user defined form. MICR coding is not included |
|
|
|
Accounts Receivable |
|
|
|
|
Invoices - Print invoices alignment and print data |
Yes |
Yes |
A/R, Chapter 15, Invoice formats, General appearance |
|
Invoices - Immediate print alignment and print data |
Yes |
Yes - Will display PDF |
A/R, Chapter 15, Invoice formats, General appearance |
|
Invoice format - Sample invoice |
Yes |
Yes |
A/R, Chapter 15, Invoice formats, General appearance |
|
Invoice formats - Location grid |
Yes |
N/A |
A/R, Chapter 15, Invoice formats, General appearance |
|
Invoice formats - Layout worksheet |
Yes |
Yes |
A/R, Chapter 15, Invoice formats, General appearance |
|
Reprint invoices alignment and print |
Yes |
Yes - Will display PDF |
A/R, Chapter 15, Invoice formats, General appearance |
|
Statements alignment and print |
Yes |
Yes |
A/R, Chapter 16, Statement formats, General appearance |
|
Statements html |
N/A |
N/A |
N/A |
|
Statement formats - sample statement |
Yes |
Yes |
A/R, Chapter 16, Statement formats, General appearance |
|
Statement formats - Location grid |
Yes |
N/A |
A/R, Chapter 16, Statement formats, General appearance |
|
Statement formats - Layout worksheet |
Yes |
Yes |
A/R, Chapter 16, Statement formats, General appearance |
|
Deposit slips alignment and print |
N/A |
N/A |
N/A |
|
Customer Labels alignment and print |
N/A |
N/A |
N/A |
|
|
|
|
|
|
Inventory Control |
|
|
|
|
Item Labels print |
N/A |
N/A |
N/A |
|
Work orders alignment and print |
N/A |
N/A |
N/A |
|
Quick work orders alignment and print |
N/A |
N/A |
N/A |
|
|
|
|
|
|
Order Entry |
|
|
|
|
Batch Invoice alignment and print |
Yes |
Yes |
O/E, Chapter 7, Forms, Field 3. Description, etc. |
|
Instant invoice alignment and print |
Yes |
Yes - Will display PDF |
O/E, Chapter 7, Forms, Field 3. Description, etc. |
|
Reprint invoice from history alignment and print |
Yes |
Yes |
O/E, Chapter 7, Forms, Field 3. Description, etc. |
|
Forms |
Yes |
Yes |
O/E, Chapter 7, Forms, Field 3. Description, etc. |
|
Fill back order form alignment and print |
Yes |
N/A |
O/E, Chapter 7, Forms, Field 3. Description, etc. |
|
|
|
|
|
|
Purchase Order - Pre-defined Forms |
|
|
|
|
Print new PO's alignment and print |
Yes |
Yes |
P.O, Chapter 5. Control information |
|
Print purchase orders alignment and print |
Yes |
Yes |
P.O, Chapter 5. Control information |
|
Print changed PO's alignment and print |
Yes |
Yes |
P.O, Chapter 5. Control information |
|
Print release PO's alignment and print |
Yes |
Yes |
P.O, Chapter 5. Control information |
|
Purchase Order - User defined Forms |
|
|
|
|
Master information -> Forms - test print |
Yes |
Yes |
P.O, Chapter 22. Purchase order forms |
|
Forms -> New P.O.'s forms |
Yes |
Yes |
P.O, Chapter 22. Purchase order forms |
|
Forms -> Change P.O.'s forms |
Yes |
Yes |
P.O, Chapter 22. Purchase order forms |
|
Forms -> Print P.O.'s forms |
Yes |
Yes |
P.O, Chapter 22. Purchase order forms |
|
Forms -> Release P.O.'s forms |
Yes |
Yes |
P.O, Chapter 22. Purchase order forms |
|
Payroll |
|
|
|
|
Checks alignment and print checks and mailers |
Yes. Use Windows printer only for graphical checks and mailers with no image file merge |
N/A |
Pay advices may be printed to PDF. However no jpg file can be merged. |
|
Employee labels print alignment and print |
N/A |
N/A |
N/A |
|
Quarterly payroll report |
N/A |
N/A |
N/A |
|
Quarterly report formats -> Sample report |
N/A |
N/A |
N/A |
|
Year-end -> Print W-2 forms |
N/A |
N/A |
N/A |
|
Year-end -> Print 1099 forms |
N/A |
N/A |
N/A |
|
Point of Sale |
|
|
|
|
Instant invoice, receipt and quote alignment and print |
Yes |
No |
POS, Chapter 7, Registers |
|
Batch invoice, and quote alignment and print |
Yes |
Yes |
POS, Chapter 6, Stores |
|
|
|
|
|
|
Manufacturing |
|
|
|
|
Invoices, packing slips, acknowledgments, quotes and product purchase orders |
Yes |
Yes |
C/O Control information and P/P Control information chapters |
You are also not required to merge the data with a graphical form file. You may choose to use Windows printer to print to a pre-printed form.
Special forms that currently cannot be printed using Windows printer include Time and Billing invoices.
There are two INI files provided for configuration of a PDF output. One is for reports (pbspsi66.ini) and the other is for forms (pbspsi.ini). They are located in the PSIB00 folder.
These settings are only used when selecting either a -PDF- or -PDFP- printer as set up in Company information. If you use a windows PDF rinter driver these setting as not used.
The reports and forms INI file have similar options. Here are the available settings installed with PBS that control all PBS forms:
|
Control |
Default Setting |
Description |
|
VAR Units |
in |
Unit of measure |
|
VAR Txttop |
.12 |
Top margin size |
|
VAR Txtleft |
.25 |
Left margin size |
|
VAR Font |
2 |
This setting used for PBS reports only (pbspsi66.ini). The number 2 indicates printing the font bolded where 1 is printing regular. |
|
VAR Point |
12 |
Text point size |
|
VAR Lnspace |
12 |
Space between lines |
|
VAR Comp |
100 |
Compression factor |
|
VAR IMGLRMargin |
.25 |
Left and right image margin |
|
VAR IMGTBMargin |
.25 |
Top and bottom image margin |
|
VAR Title |
Passport Business Solutions Forms |
This is the title that gets written to the PDF file properties. |
|
VAR Subject |
* |
This is the subject that gets written to the PDF file properties. |
|
VAR Author |
Passport Software, Inc. |
This is the Author that gets written to the PDF file properties. |
|
COLONEFLAG CODE= |
~ FACE=2 SIZE=8 |
This setting is for forms only (pbspsi.ini). This setting is used to cause a smaller font. Some forms printing programs will print addresses in a different font size when a certain number of characters have been reached. |
|
COLONEFLAG CODE= |
` FACE=1 SIZE=12 |
This setting is for forms only (pbspsi.ini). This setting is used to cause a smaller font. Some forms printing programs will print addresses in a different font size when a certain number of characters have been reached. |
* This form was generated in Passport Business Solutions.
Changing of either .ini file should not be necessary. However, before changing a configuration file, it is recommended that you make a copy so you can revert back to the original settings.
When a value is saved in this file, it will produce a “watermark” on all PDF generated reports. By default there is no setting in this file. But you could add your company name or anything else that is text. Keep in mind this is a global file and effects reports for all PBS companies. You may set the font size, alignment, color, transparency of the font.
Open the Stamp.txt file for additional instructions.
If you do not use PBS on Windows or Thin client, then you can ignore this section.
In this section, and throughout the PBS user documentation, we refer to the form as a file that is a graphical image that represents the form and is stored in the IMAGES directory. We refer to the format as the field by field design that may be set up in a PBS module, such as A/R Invoice formats.
As stated in the previous section, several of the special formats allow you to merge the PBS data with a file that contains the form design.
There are some form files provided by Passport for invoices, statements and purchase orders. You will find them in the IMAGES directory. You can modify them as needed to make them your own.
Form files are assigned to the format in PBS. This table shows the where form assignments are located per the menu selections.
|
Module |
Menu selection |
|
Accounts Payable |
Master information -> Check forms |
|
Accounts Receivable |
Invoice formats -> General appearance |
|
Accounts Receivable |
Statement formats -> General appearance |
|
Order Enter |
Master information -> Forms |
|
Purchase Order |
Master information -> Control information |
|
Purchase Order |
Master information -> Forms |
|
Point of Sale |
Setup information -> Stores - Invoices only |
|
Point of Sale |
Setup information -> Registers - Device types include Invoices, Receipts and Quotes |
|
Manufacturing - Customer orders Invoice, Picking Ticket and Acknowledgment |
Control information |
|
Manufacturing - Product Purchasing |
Control information |
When you enter the form file name per the module setup, it must be spelled exactly as the file name with the proper extension. If you are running PBS on thin client with Linux as the server the name must be the same case as well.
See the associated user manual documentation for more details on setting up a form file with a format.
When you merge a graphical image form file with data, then you may select Windows printer, a Company information -PDF- or -PDFP- printer.
Other printers defined in Company information will not merge the image form file with the PBS data. In this case, only the data will printer.
It is recommended that you do not print checks or labels to Windows printer or a PDF printer. However Payroll Pay advices can only be sent to a -PDF- printer.
Graphical images cannot be used with reports.
You can use any appropriate program to design your graphical image form file as long as it can be saved in either a JPEG (jpg) or Bitmap (bmp) file type.
File Size
The size of the form file will have an impact on two important variables; performance and quality. Generally, the greater number of pixels per inch the form file contains, the greater the quality, but the slower the printing performance becomes. The greater the number of pixels per inch, the greater the file size. Therefore, when you design your form, we recommend that you make it as small as possible but still maintain an acceptable quality. Making a PBS form between 200 to 300 pixels per inch will usually be an acceptable quality.
If your printer only prints at 300 pixels per inch quality, there is no advantage to create an image that has 1200 pixels per inch. So, do not produce the image file at a quality greater than your printer will accept.
JPEG files are a compressed file format and are always smaller than Bitmap files, even when they both have the same number of pixels per inch. Because of compression inherent in a JPEG file, this file type is stored with less quality than a Bitmap. However most high and true color images compressed with JPEG show little or no degradation when printing.
Image Printing in PBS
The printable area of an image, using Windows printer or a PDF printer, is usually smaller than the printable area using standard Company information printers. This is especially true with the laser printers with which we tested. Because of this, you will probably have to modify your format (for printing data) to be shorter, and sometimes narrower, than any pre-printed form that you are currently using.
In PBS, an image file will print within the margins printable area of your printer. If a form is designed for 8.5x11 inches, but the printable area on the page is only 8x10.5, then the PBS program will shrink the image to print in a 8x10.5 area. Design the image go all the way to the edges.
Modifying an Image and Format
You may find it easier to modify one of the images provided by Passport because these are pre-designed to work with PBS. You may replace a logo in an existing image with your own logo.
You may also have to modify the format to fit the image. In some cases this is easier than modifying the image.
Whenever possible, always print the form to the same printer each time as different printers could produce different results.
Using a Company information PDF printer is recommended for PDF file generation. However, you may try using a Windows printer with a PDF windows driver. What this means is that when you print from PBS you are selecting Windows printer and then selecting a Windows PDF driver. As this is not recommended you are on your own with this method and no support will be provided.
There may be no issues with creating PBS reports using this method. The exception are posting reports. Do not use a PDF driver for posting reports. Also, do not use a Company information PDF printer for posting reports either.
There are issues when printing forms to a PDF driver and it is recommended that you do not do this. However, if you do, here are some issues that pertain to creating Special forms as PDF files:
| • | A printer driver will not merge the PBS data with an .jpg graphical image file. Only the data will print in the file. |
| • | If you are printing an invoice, A/R statement, G/L financial statement or purchase order, you should only print one at a time. Printing multiples will put multiple customers’ invoices, etc., in the same file. |
| • | Never print a check or ACH direct deposit remittance to a PDF file. |
| • | Our limited testing was with an Adobe Acrobat PDF driver. The Acrobat driver can change with any new version and can make the results unpredictable. There are other PDF generation programs like Microsoft print to PDF, Amyuni, PDF995, CutePDF, PDF Creator, PDF995 and others. We have not tested PBSreports or forms printing with any of these drivers and results will likely vary with each. |
The printable area on a page can be different per printer model. An adjustment is provided:
| • | Company information laser printer: The adjustment allows you to move the text up or down and right or left so that it aligns properly on a form. |
| • | Windows printer only allows a down and right alignment adjustment. |
When printing a special form, after you press <Enter> at Field number to change ? or select the OK button, you must mount the form on the printer. After mounting the form answer Done or check the box. You must select the printer on which the forms have been mounted.
When printing to a laser printer, you are first asked to enter the top and left margins of the page and sometimes the number of form copies or number of labels.
Next, you are asked Print alignment ?.
You can save forms by printing the alignment sample on plain paper. After printing, place the plain paper alignment on top of a form page and hold it up to a bright light to verify the alignment. Make any adjustments necessary and continue printing alignment samples on plain paper until you have the correct alignment. Load the laser forms in the paper tray when you are ready to print.
If you want a sample form with X’s and 9’s printed to check the alignment on the printer, answer Y or check the box. A sample form will print. You are asked, Print alignment ?. You can print as many alignment examples as you wish.
You may change the top and left margins before printing another alignment. You can enter positive or negative adjustments in tenths or hundredths of an inch.
When the alignment is correct, answer N to the Print alignment? question. The form will then be printed. When all forms have been printed, mount regular paper on the printer. Answer Done or check the box when you have mounted the paper.
Some of the alignment steps are the same when printing to Windows Printer but there are some exceptions.
The mechanism for the Windows alignment is different than the Company information printer alignment. The Company information '0','0' in most cases is a different page location than Windows printing '0''0'. This is because they use two different technologies.
When printing a form to a Company information printer, if at '0' column and "0" row, the COBOL program determines where this is by sending precise codes to the printer. In most programs the printing starts at three rows (print lines) from the top and the starting column varies per program and in the case of these PCL (printer control language) codes, you can enter either negative or positive numbers for adjusting the alignment.
When printing a form to a Windows printer, the form starts at relative '0' of the X-Y axis, (top and left margin on the page) and this is the upper left corner of the page. You may not use negative numbers for aligning a form using Window printer as by default you are starting as far to the top and left as you can go on the page. With most Windows printer drivers, they allow a fewer maximum total number of lines to print on a page, based on a six lines per inch standard, as can be done with Company information PCL codes printing. For example, if you can print 66 lines using a Company information printer setup, you may now only be able to print 62 lines using a Windows printer driver.
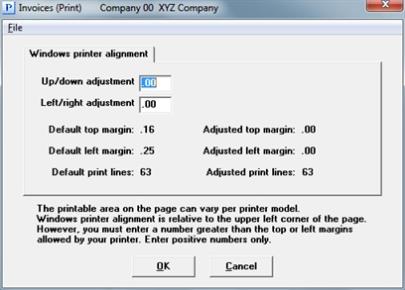
The alignment for Windows printer displays default and adjusted information about the top margin, left margin and maximum number of print lines per page.
Here is a graphical mode example of the Windows printer alignment:
Here is a character mode example:
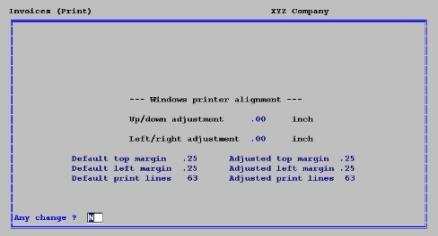
The program determines where the current margins occur and the maximum print lines that can be used for printing. When you make an adjustment, greater than the default top or left margin, then the maximum print lines may change. If this occurs, then you may have to adjust your format accordingly.
The maximum number of printable lines will vary per printer. When doing a Windows printer alignment, you will see the number of printable lines change when you enter a larger up/down adjustment number. If your current format fails to align, you must modify the format to fit your printer. If you print the same form on multiple printers and they allow a different number of printable lines, you must design the format to the printer that allows the least number of lines.
You can adjust the number of print lines for many PBS forms, including statements, A/R invoices, O/E forms and P/O forms. Refer to the corresponding user documentation for additional or special instructions.
With some special forms you will not be able to adjust the print lines. If your printer driver will not provide enough lines to print the form using Windows printer, then you will have to use a Company information printer.
|
Note |
If the form length is adjustable, setting it to less than 66 lines may be necessary when using Windows printer. This is done from the forms design menu selection. |
When you use a Company information printer, you are not utilizing the Window workstation printer setup drivers. You are actually bypassing these drivers and printing directly to the printer.
Because you are bypassing the windows printer driver, to print reports and special forms, Hewlett-Packard Printer Control Language (PCL 5) commands are used to control specific features of your laser printer. Located on the printer screen of the Company Information selection is a list of available printers. If your printer is listed, the appropriate Printer Control commands are automatically issued to cause your laser printer to work properly with PBS. If your printer is not on the list of available printers, select Other(option 12) to set up your printer. To provide the correct printer controls, you must supply certain command strings. This will be covered in the PCL Codes section.
|
Note |
If your printer is not listed as one of the available printers, one of the printers listed may work for your printer anyway. Try the available printers listed and you may find one that matches your printer. For example, when printing to a OKI 321 printer we have found that the Epson type works best when it is required to print compressed fonts. Also, the HP LaserJet IV type works for most laser printers, as long as they provide PCL 5 compatibility. |
Standard compress and normal commands are used in printing PBS reports. The compress codes are sent to the laser printer before printing a report to set the printing in a smaller font so that the 132-column report fits on the 8-1/2 inch wide paper. The normal (80 column) codes are sent after printing the report to return the printer to normal sized font. These reset the printer to its previous state so that the next print job is not affected by your printer settings.
The remainder of this section is intended for those who require a more in-depth understanding of the standard set of laser printer control codes used in Passport Business Solutions software to print pre-printed forms and labels. This information is relevant if you want to set up a printer type that is not on the list of installable printers. To use any of the laser printer features, such as a different font, page orientation etc., it is necessary to enter an appropriate command string.
The compress and normal codes are not used to print special forms on a Hewlett-Packard or compatible laser printer. Instead, a series of codes are used.
In order to print special forms, you must enter PCL commands. These commands are used to control various laser printer features such as margins, font selection, or other features. Each PCL command has an associated hexadecimal value. You enter PCL commands by typing hexadecimal digits at the appropriate screen.
For this description, the PCL commands have been divided into the following three classes:
| 1. | Printer reset command |
| 2. | Job and page control commands |
| 3. | Font control commands |
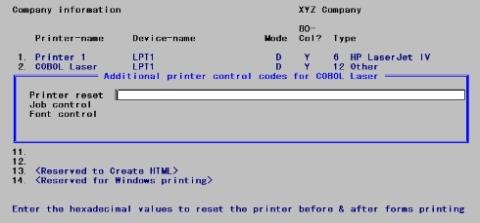
In the Control Information selection, however, you will note that commands are entered as Printer reset, Job control, and Font control.
Note that these command lists are only a partial listing of features and functions. If you are using an HP (or compatible) printer, search online for a PCL 5 Printer Language Technical Reference Manual or equivalent for information on PCL commands.
The PCL printer reset command sets all printer feature settings to their default settings. These default settings are printer dependent. Refer to your printer manual for these values. A reset code should be sent to the laser printer at the start and finish of a print job. It is sent initially to establish the printer with a default condition, and at the end to re-establish leave it in the default condition.
This ensures that the next print job is not affected by your settings. This is particularly important when sharing printers. Commands remain in the printer until other commands are received or the printer is reset.
The PBS printer reset code consists entirely of the PCL reset command.
Job and page control codes are sent to the printer immediately after the printer reset codes. The following table lists some of the PCL commands that are used for job and page control. For this example, they are listed in the order that they are sent to the printer. The command sequence is determined by the sequence of the hex command string entered in the Company Information selection.
|
Sequence |
Control Code |
|
1 |
Perforation Skip = Disable |
|
2 |
Page Size = Letter size (see note below) |
|
3 |
Top Margin = 0 |
|
4 |
Line Spacing = 6 lines per inch |
|
5 |
Text Length = 66 lines |
|
6 |
Page orientation = Portrait |
|
Note |
For the HP LaserJet Plus, the Page Length command is used because this printer does not recognize the Page Size command: Page Length=66 |
The font control codes are the last group of codes sent to the printer. These codes set parameters such as symbol set, spacing type, and typeface family.
|
Sequence |
Control Code |
|
1 |
Symbol Set = Roman-8 |
|
2 |
Spacing = Fixed |
|
3 |
Pitch = 10 characters per inch |
|
4 |
Height = 12 point |
|
5 |
Style = Upright |
|
6 |
Stroke Weight = Medium |
|
7 |
Typeface Family = Courier |
It is necessary to use all of the above PCL commands to ensure that the correct font is selected.
The special forms codes used for printer reset, job control, and font control are shown on the following pages.
The codes are shown in hexadecimal format: The PCL commands are identified with the names as shown above.
PCL commands are generally sequenced as follows: reset, command type, options (features), and termination code. Command strings should start with X1B45 (The subscripted X indicates HEX.).
Reset Code
|
Function |
Hex |
Decimal |
|
Reset |
1B 45 |
027 069 |
HP LaserJet III
|
Function |
Hex |
Decimal |
|
Escape |
1B |
027 |
|
Command Type |
26 2C |
038 108 |
|
Perforation skip = disable |
30 6C |
048 108 |
|
Page Size = letter |
32 61 |
050 097 |
|
Top margin = zero |
30 65 |
048 101 |
|
Line spacing = 6 LPI |
36 64 |
054 100 |
|
Text length = 66 lines |
36 36 66 |
054 054 102 |
|
Page orientation = portrait |
30 4F |
048 079 |
HP LaserJet Plus
|
Function |
Hex |
Decimal |
|
Escape |
1B |
027 |
|
Command Type |
26 6C |
038 108 |
|
Perforation skip = disable |
30 6C |
048 108 |
|
Page Size = 66 lines |
36 36 70 |
054 054 112 |
|
Top margin = zero |
30 65 |
048 101 |
|
Line spacing = 6 LPI |
36 64 |
054 100 |
|
Text length = 66 lines |
36 36 66 |
054 054 102 |
|
Page orientation = portrait |
30 4F |
048 079 |
HP LaserJet Plus
|
Function |
Hex |
Decimal |
|
Escape |
1B |
027 |
|
Symbol Set = Roman 8 |
28 38 55 |
040 056 085 |
|
Escape |
1B |
027 |
|
Command type |
28 73 |
040 115 |
|
Spacing = fixed |
30 70 |
048 112 |
|
Pitch = 10 CPI |
31 30 68 |
049 048 104 |
|
Height = 12 points |
31 32 76 |
049 050 118 |
|
Style = upright |
30 73 |
048 115 |
|
Stroke weight = medium |
30 62 |
048 098 |
|
Typeface family = Courier |
33 54 |
051 084 |
To enter PCL command strings, go to the third screen of the Company information selection. The following screen displays:
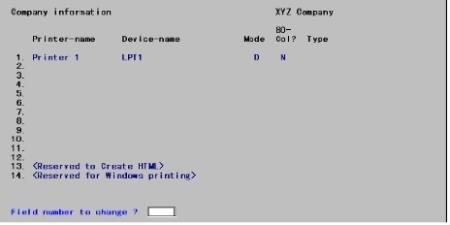
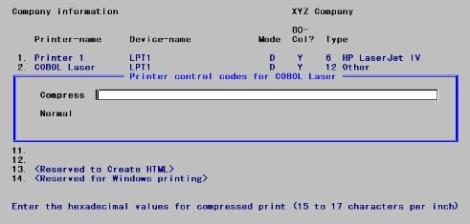
From this screen you may modify any existing printers or add an additional printer(s). At the Field number to change ? selection, enter the appropriate number. In the example above, notice than an HP LaserJet IV is listed. To add another printer for LPT1, enter 2. In the following example, the printer assigned to LPT1 will be redefined with a different command string. This allows the same printer to be shared with the same real device having a different features set.
Type the following:
|
Myprinter |
In the Printer-name field. |
|
-D LPT1 |
Assumes your printer is on LPT1 |
|
D |
Assumes this is a local (direct) printer |
|
Y |
80-column |
|
12 |
This enables you to enter PCL commands for that printer. |
Printer codes are non-printing characters sent to the printer as needed to turn on or turn off various printer characteristics, much as you would do manually by pressing a button on the printer.
Printer codes are entered only if you chose 12 for Other in the previous field. If the system recognizes the printer it already knows the printer codes. You may however describe your printer as Other even though it is included on the list of recognized printers. This is sometimes advantageous when you want to set printer attributes other than the standard ones. For instance, if your printer has a draft quality mode and a near letter quality mode, you might define the same physical printer twice so that you could use it in either mode.
Printer codes are represented in hexadecimal format: each code consists of a pair of digits, where a digit is 0 through 9 and A through F.
| • | Some printer manuals show only escape codes (or control codes, etc.), and not the equivalent hexadecimal codes. In these cases, convert the codes to their equivalent hexadecimal codes. |
| • | Although there is room for 60 characters, most printers use much shorter codes. |
| • | On Linux systems local printers are restricted to 48 characters. |
| • | When entering command strings, do not enter any spaces between the hex digits. |
Two screens appear in succession for entry of printer codes.
The following screen displays for entry of the Compress and Normal codes. This applies to both laser and non-laser printers.
Compression printing should be about 15 to 17 characters per inch; if your printer has several compression modes, use the one that comes closest to this. Compression mode is needed to print 132 columns of information on 8¾ inch paper.
Normal printing is considered to be 10 to 12 characters per inch. Normal codes are sent to the printer to return it to normal-sized font. This is needed so that special forms (such as checks) can be printed at full width.
After entering your codes and answering N to Any change ?, you are asked Is this a laser printer?. This is because laser printers require additional control codes.
This screen displays only if you responded that this was a laser printer.
This resets the printer’s feature settings (top margin, left margin, page size, etc.) to their default values. These codes are sent at the start of a new print job. This ensures that the settings of the previous print job do not interfere with the new print job. They are also sent at the end of a print job so that the settings of that job do not remain in effect for following print jobs.
These are used to establish page size, page length, top margin and other settings. These codes properly configure the printer for the print job and are sent to the printer at the start of a print job.
This sets the type style, size, height and other settings. They are sent to the printer after the job control codes.
After entering the desired codes and answering N to Any change ?, you are returned to the PBS menu. You may proceed with printing. Check the alignment of your forms prior to printing, as shown below.
The Linux Company information printer setup screen differs from Windows.
The Linux printer screen (that is, the third screen of Company information) displays a Mode column but the available values are different than Windows. The Linux Mode field allows one of three values:
|
L |
For local printing |
|
S |
For spooled printing |
|
D |
For direct printing |
Depending on what you have entered for device name, not all these choices may be available.
If you select L, you must supply additional control codes for auxiliary ports.
In some cases an asterisk will display next to the Device-name field. This is needed for Thin client installations to identify the server printers vs. the local printer.
Refer to the example below to clarify the use of these fields.
For special forms (such as payroll checks, customer statements, or picking tickets), or anything that uses pre-printed forms, the operating system spooler should not be used.
If you intend to use one or more Linux spooled printers, you need to make special entries in Company information and must also modify the cblconfig file (used when PBS software is started). These entries will depend on how you set up and named your printers when your Linux system was installed or updated.
If you are using Thin client on Linux the same printers must be set up in the cblconfi file. For other settings in the configuration files, see the COBOL Configuration File appendix.
The name you supply as the Device-name in Company information must match, exactly, the DEVICE-NAME for the printer in the cblconfig file. As a suggestion, use PRTR01 through PRTR13 for your spooled device names. A typical partial screen output from the printer setup of the Company information selection is shown below:
|
Printer name |
Device name |
Mode? |
80-col? |
Type |
|
INVOICES |
PRTR01 |
S |
Y |
Epson |
When entering the device name, remember that names in Linux are case sensitive.
Each printer that you have defined as “spooled” in Company information must have an entry in the cblconfig file that resides in your PBS top-level directory. The name in the Device-name field must match the DEVICE_NAME entry in the cblconfig file exactly for the spool printer to function correctly.
The entries, made in cblconfig, for Linux are similar in concept but differ in syntax. Entries have the following format.
LINUX
DEVICE_NAME -P lpr -l -Pprinter-name
DEVICE_NAME: Enter the name of this device exactly as you have entered it in the Device-name field in the Passport Business Solutions Company information.
printer_name: This is the name of the spool printer that you set up in your Linux system.
If the lpr print spooler is filtering out the printer compression codes, include the -l argument in the cblconfig file like the Linux example above.
|
Note |
When using Thin client in a Linux environment, the printers must be set up in two configuration files, cblconfi and cblconfig. The first is for printing from the terminal emulation screens and the second when printing via Thin client. |
| • | If you don't setup the entry in cblconfig (cblconfi for Thin client) for the printer device-name your using in the company file, then the report will be printed to a file of that name in the top-level directory. |
| • | Notice that Linux uses lpr -P. You might also find that your system's spool command is not lpr. In general, this format will work for you. The objective is to use the spooler command that will spool the output in a “quiet” manner. |
| • | Defining your spool printers to use the DUMB printer driver within Linux will prevent printer driver properties from interfering with your reports and ensure that reports are sent to the printer as raw data. In addition, you can modify the printer interface drivers to do or not do form feeds as required. See the section below on Local Printer Technical Notes. |
| • | The software does NOT do a form feed at the end of spooled reports. |
You can force this in one of two ways.
1) Un-comment the following line in your cblconfig file:
PAGE-EJECT-ON-CLOSE 1
This setting in cblconfig will apply to ALL of the spool printers you have defined in the cblconfig file.
2) On Linux you need to alter the spooler to do a form feed at end of report.
WYSE terminals are no longer supported. Printing from a dumb terminal may or may not function properly. It is recommended that you use a Windows operating system when printing. If it is a Linux system, then a terminal emulation application running on Windows is best. You are welcome to try the following, but we may not be able to fix a problem if one is encountered.
Local printing allows a printer be attached to the Auxiliary port of a dumb terminal. Refer to your terminal hardware manual since you will need to enter the codes for Auxiliary Port On and Auxiliary Port Off.
If any of the codes are incorrectly entered, local printing will not function properly.
The following example illustrates the entries for local printing on a Wyse 60 terminal attached to serial port /dev/ttyla on a 386 UNIX machine. The serial printer attached to the Wyse 60 is an 80-column printer, so compressed print was selected. The following is shown for example only. Refer to user manual.
|
Printer Name |
Device Name |
Mode |
80-col? |
Type |
|
Local Printer |
/dev/ttyla |
L |
Y |
Other |
|
Compress |
1B2104 |
|
|
|
|
Normal |
1B2100 |
|
|
|
|
Aux on |
12 |
|
|
|
|
Aux off |
14 |
|
|
|
The Compress codes were listed in the printer manual as condensed and were shown as ASCII 27 33 04. The Normal (Expand) codes were listed in the printer manual as 10cpi and were shown as ASCII 27 33 00. ASCII 27 is Hex 1B and ASCII 33 is Hex 21. Both 00 and 04 are the same in ASCII and Hex. Most printer manuals list both the ASCII and Hex values for these codes. Always enter the Hex codes for Compress and Normal. If you have questions about converting ASCII to Hex, consult with your reseller.
Aux on uses the values for Transparent print mode on, listed as <ESC d#>. Aux off uses the values for Transparent print mode off, listed as <Ctrl T>. These were also converted to Hex as shown in the sample above.
For compressed print for local printers not shown on the displayed printer list, only 48 characters may be entered for Compress and Expand codes (unlike the 60 characters available for direct and spooled printers).
Once you enter the local printing codes into the Passport Business Solutions Company information, you should run some test printouts (such as the Valid G/L Accounts List) to ensure the printer is functioning properly.
When using local printing in the Passport Business Solutions software, you must not use the keyboard until printing concludes.
You should know that this feature is NOT tested for every release. If you encounter and issue, please let technical support know.
You may want to control and send specific font print characteristics to your -Q printer. With PBS you can do this as part of the -Q data string as part of the Device name field. This will work for all reports and most forms. See the Device name field in the Company information chapter.
As contained in the PCL settings, font information is sent based on the standard or other printer Type field. So, for this scheme to work the Company information must have the question “80 column” entered as unchecked (N) so that the printing program does not issue any printer control characters.
In this scheme, the DIRECT=ON is not used, but is substituted with Font characteristics which are fed to the Windows driver via the AcuCOBOL runtime. Here is a list of the available characteristics.
If the results you are getting is not what you want, experiment with these variables. For example you may have to alter the font pitch in order for the print to fit on a page.
FONT
Use FONT to specify a single font name. The font name may have embedded spaces, but may not contain double or single quotes. If the font does not exist, the closest matching font will be chosen.
It is recommended that you use a fixed length font rather than a variable length font. If you do not, the columns on most reports will not line up properly.
Whatever font you enter, it MUST be installed on the workstation that is going to printer the document.
|
Note |
The runtime does not align columns. If you are printing a report containing columns, you should use a fixed-width font. |
PITCH
This value specifies the point size of the font. Pitch does not determine the number of characters per line. If you use a larger pitch, the characters simply appear more crowded. For example, when printing 132 columns, a pitch of 10 will produce better character spacing than a pitch of 12.
LINES
This specifies the lines on a page. This instruction will work for most reports.
It is recommended that you do not use this instruction for forms. The number of lines on a page for user definable forms, like A/R Invoices, O/E Invoices, Statements, user defined Purchase orders, are determined by the design characteristics of the form and not this instruction. The number of lines for hard coded forms are determined by the programming.
COLS
Specifies the number of columns (width) on the page. This number is not validated by the runtime or the spooler. Choose a number of columns that coordinate with the selected font and pitch when designing the report layout.
Most PBS reports require no less and no more than 132 columns to print the data. Therefore the usefulness of this instruction is limited.
ORIENTATION
If your printer supports this feature, ORIENTATION allows you to specify LANDSCAPE or PORTRAIT orientation for the report. As the PBS default is Portrait, you would only want to specify Landscape.
COPY
If your printer supports this feature, COPY allows you to specify the number of copies to print.
COLLATE=1
This specifies that multiple print copies will be collated. In order for COLLATE to have any effect, COPY must also be set to a value greater than 1.
Examples
The following string in the Company information device name field would produce 2 copies that are collated:
-Q \\Server\Ptr;FONT=COURIER NEW;PITCH=11;COPY=2;COLLATE=1;COLS=132
This set of instructions will print reports in landscape.
-Q \\Server\Ptr;ORIENTATION=LANDSCAPE;PITCH=9;FONT=Courier
Notice that a semicolon is used between EACH printer instruction.
If the instruction does not fit on the first line, wrap it around to the next line with NO SPACES at the end of the first line.
There is one exception where this scheme will not work. This is in the A/P check printing. For certain check formats, both condensed and full size printing are required. The stubs are condensed and the check body is full sized. This type of control is written into the check program and should not be overridden via this scheme.
Depending on host operating system version and client operating system version, the UNC can be reported at the client as one of two values:
\\host_name\host_share_name
or
\\host_name\host_LPN
Therefore it is important when the printer is hosted to make sure that the Local Printer Name (at the host) is the same as the share name.
This way a consistent identification can be made for all clients running Passport Business Solutions.
You can have multiple printer setups using multiple COBOL Configuration files. You can point multiple configuration file printer setups to the Company informationDevice-name field. This could be useful if you need more than the 12 printers to which you are limited in Company information.
There is one limitation to this type of setup. In Company information if your printer is an 80 Column type and you selected Y for the 80 Col? field, then each setup must share the printer Type field. Therefore this may not work for your situation. But if it does, then read the remainder of this section.
The following is an example of setting up a general printer for most PBS users. In the standard configuration file you have this printer defined. In a different configuration file you have a printer setup just for your Order entry users to print invoices.
First set up a printer in Company information and in the Device-name field enter PRINTER1. The Printer name should be something that is easily recognizable by multiple users. The Mode, 80 Col? and Type fields will depend on the both printers you are using but must be the same for both.
Next, enter in the main cblconfi file a line like the following:
PRINTER1 -Q \\WIN2000\HP LaserJet 4MP;DIRECT=ON
You also want the PRINTER1 to go to a different printer for users of Order Entry to print invoices. Next make a copy the cblconfi file and name it cblconfi.oe. It has the ‘oe’ extension because we are setting up a printer to printer order entry invoices for order entry users.
Now add a line to cblconfi.oe file to access a different printer:
PRINTER1 -Q \\WIN3000\HP Laser5;DIRECT=ON
Next modify the start menu shortcuts of the order entry users to access the cblconfi.oe file.
Finally test the printing from a general users printer and then from the order entry users printer. Select the line in Company information that has the PRINTER1 set up. The printing should go to the different printers as defined in the configuration file.
Thin client is recommended over printing via remote desktop. However, if you are printing over remote desktop there are some things that you should know.
You may print using Windows printer when using remote desktop connection. However, you may not use a company information printer, unless it is -PDF- or unless you want the print job to go to a printer at the remote location.
What is meant my a remote location is this: The server where PBS is installed is located away from the location where you want to print. The print server does not and cannot have your check printer defined.
If you are printing payroll checks, then it is highly recommended that you get Thin client to print at your location when you are remote.
In this case, Thin client is the only way your computer will recognize a company information printer.
When posting it is recommended that you print your registers to disk. That way if the connection is lost during printing, then the print job is more likely to finish.